Soft Christmas Peppermints – A Classic Holiday Candy Recipe
Soft Christmas Peppermints – A Classic Holiday Candy Recipe
Introduction
There’s something about peppermint at Christmas that feels almost magical. The scent alone can take you straight back to childhood winters, cozy kitchens, and the sound of holiday music drifting through the house. Soft Christmas Peppermints are one of those timeless treats that quietly steal the show. They’re not flashy. They don’t demand attention like towering cakes or elaborate desserts. Instead, they sit sweetly on a platter, delicate and charming, waiting to melt on your tongue.
I remember seeing little dishes of pastel mints at holiday gatherings, tucked between cookie trays and hot cocoa stations. They always felt special, like a hidden gem only the patient guests discovered. What makes these homemade Soft Christmas Peppermints even better is how simple they are to prepare. No baking, no complicated techniques, just a few pantry staples transformed into something festive and beautiful.
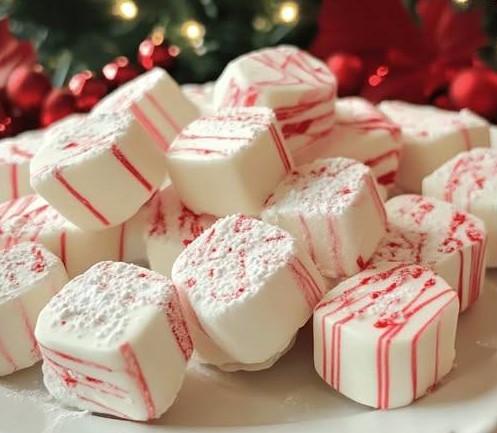
Their soft, buttery texture paired with that cool peppermint finish makes them irresistible. And the candy cane twist design? Pure holiday joy. Whether you’re making them for a family gathering, a cookie exchange, or as a handmade gift, these mints bring warmth, nostalgia, and a little sparkle to any celebration.
Soft Christmas Peppermints
Ingredients:
½ cup butter, softened
3 cups powdered sugar
2 tbsp heavy whipping cream
¼ tsp peppermint extract (adjust to taste)
Red gel food coloring
Instructions:
Whip the Butter:
In a mixing bowl, whip the softened butter until light and fluffy to create a smooth base.
Mix Ingredients:
Gradually add heavy whipping cream, powdered sugar, and peppermint extract to the butter. Continue to beat until the mixture becomes firm, smooth, and manageable.
Color and Shape:
Divide the dough into two parts: three-quarters remain white, and one-quarter colored with red gel food coloring. Roll each part into long, thin ropes.
Twist the white and red ropes together to create a candy cane effect. Cut into small pieces or pinch off to form individual mints.
Dry and Set:
Allow the mints to air dry for 1-2 hours until the surface firms up. Cut into bite-sized pieces if needed and let them dry for an additional 24 hours to fully set.
Quick Facts:
Prep Time: 15 minutes
Servings: Makes about 40 mints
Calories: Approx. 60 kcal per mint
Serve these charming Soft Christmas Peppermints as a sweet finale to your holiday feast or package them beautifully for a thoughtful homemade gift.
Helpful Tips for Perfect Peppermints
Even though this recipe is wonderfully simple, a few small tips can make your mints truly bakery-worthy.
First, make sure your butter is properly softened. It should be soft enough to whip smoothly but not melted. If it’s too cold, your mixture may end up lumpy. If it’s too warm, the dough can become sticky and difficult to shape.
When adding peppermint extract, start with the listed amount and taste carefully. Peppermint extract can be strong, and a little goes a long way. You can always add more, but you can’t take it out once it’s in.
If the dough feels too soft to roll into ropes, let it rest for 10–15 minutes. A short rest can make shaping much easier. On the other hand, if it feels too firm, knead it gently with your hands to warm it slightly.
For coloring, gel food coloring works best because it adds vibrant color without making the dough too wet. Liquid coloring can thin out the mixture and affect the texture.
Fun Variations and Substitutions
While the classic red and white candy cane look is iconic, you can easily customize these mints.
Try green and white for a festive twist, or pastel colors for winter-themed parties. You can even divide the dough into multiple portions and create swirled patterns.
If peppermint isn’t your favorite, consider using vanilla, almond, or even orange extract for a different flavor profile. The buttery base pairs beautifully with many extracts, making this recipe incredibly versatile.
For a slightly richer taste, you can experiment with a tiny pinch of salt to balance the sweetness. Just be careful not to overpower the delicate peppermint flavor.
Serving Ideas for the Holidays
These Soft Christmas Peppermints shine in so many settings.
Place them in small bowls around your home during holiday gatherings. They’re perfect for guests to grab between conversations. Add them to cookie platters for variety and color contrast. Their bright swirls look especially beautiful next to chocolate cookies or gingerbread.
They also make thoughtful homemade gifts. Arrange them in decorative tins or clear treat bags tied with festive ribbon. Because they’re bite-sized and elegant, they feel both charming and personal.
You can even use them as edible table decorations. Scatter a few around place settings or add them to dessert boards for a festive finishing touch.
Storage and Freezing Tips
Once fully dried and set, store your mints in an airtight container at room temperature. They should keep well for up to two weeks, making them ideal for preparing ahead of busy holiday schedules.
If your home is particularly warm, consider storing them in the refrigerator to maintain their shape. Just allow them to come to room temperature before serving for the best texture.
These mints can also be frozen. Place them in a single layer in an airtight container, separating layers with parchment paper. When ready to enjoy, thaw them at room temperature. Properly stored, they can last up to two months in the freezer.
Frequently Asked Questions
1. Why are my mints too soft?
If your mints remain very soft after drying, the mixture may have been too warm or slightly under-mixed. Allow additional drying time, especially in humid conditions.
2. Can I make these ahead of time?
Absolutely. They’re perfect for making several days in advance. Just store them properly once fully set.
3. Can I use natural food coloring?
Yes, but be aware that natural coloring may produce softer shades rather than vibrant red.
4. Do I need special equipment?
No special tools are required. A mixing bowl and hand mixer are helpful, but you can even mix by hand with a sturdy spoon.