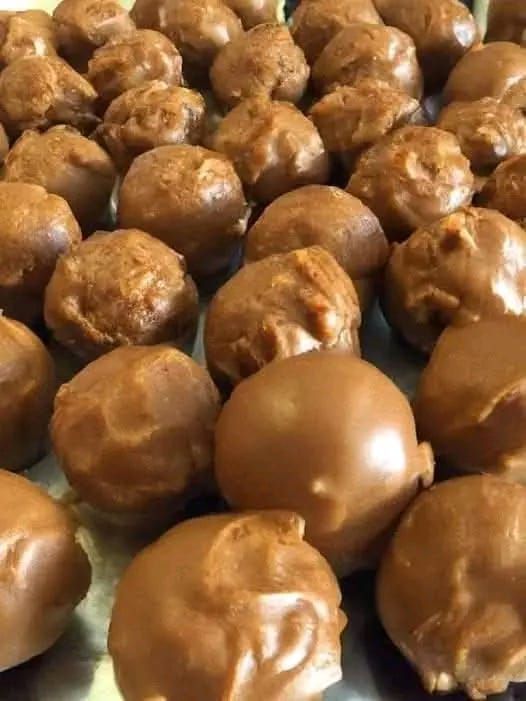
Butterfinger Balls – Irresistible No-Bake Peanut Butter Chocolate Treats
Butterfinger Balls – Irresistible No-Bake Peanut Butter Chocolate Treats
Introduction
There are some desserts that don’t just satisfy a sweet tooth—they completely take over the moment. Butterfinger Balls are exactly that kind of indulgence. Rich, creamy, crunchy, and coated in smooth chocolate, they bring together everything we love about homemade treats in one bite-sized piece.
This is the kind of recipe that feels like it belongs in a family kitchen, especially during holidays or cozy weekends. You know the scene—someone mixing peanut butter and sugar in a big bowl, someone else sneaking a taste when no one’s looking, and trays of chocolate-coated treats setting on the counter. It’s simple, nostalgic, and honestly, a little addictive.
What makes these Butterfinger Balls truly special is the contrast of textures. The creamy peanut butter base melts in your mouth, while the crushed candy bars add that unmistakable crispy crunch. Then comes the chocolate coating—smooth, slightly firm, and the perfect finishing touch.
Even better? There’s no baking required. That means less fuss, less time, and more reward. Whether you’re making these for a celebration, gifting them to friends, or just keeping a batch in the fridge for those “I need something sweet right now” moments, they never disappoint.
Butterfinger Balls
Ingredients:
2 cups creamy peanut butter
1 cup unsalted butter, softened
1 teaspoon vanilla extract
4 cups powdered sugar
4 cups crushed Butterfinger candy bars
2 cups semi-sweet chocolate chips
1/4 cup vegetable shortening
Directions:
In a large mixing bowl, combine creamy peanut butter, softened unsalted butter, and vanilla extract. Mix until well combined.
Gradually add powdered sugar, one cup at a time, stirring until the mixture becomes thick and dough-like.
Fold in the crushed Butterfinger candy bars, ensuring they are evenly distributed throughout the dough.
Shape the mixture into small, bite-sized balls and place them on a baking sheet lined with parchment paper. Refrigerate for about 30 minutes to firm them up.
In a microwave-safe bowl, combine semi-sweet chocolate chips and vegetable shortening. Microwave in 30-second intervals, stirring between each interval, until the chocolate is smooth and fully melted.
Using a fork, dip each peanut butter ball into the melted chocolate, ensuring it’s fully coated. Allow any excess chocolate to drip off, then place the coated ball back on the parchment paper.
Let the chocolate-covered peanut butter balls set at room temperature until the chocolate hardens.
Store the Butterfinger Balls in an airtight container in the refrigerator until ready to serve.
Nutritional Information:
Prep Time: 30 minutes
Total Time: 1 hour (including chilling time)
Calories: Approximately 180 kcal per ball
Servings: Makes about 36 balls
Cooking Tips & Easy Variations
Let’s get one thing straight—this recipe is already dangerously good. But if you want to avoid messing it up, pay attention.
First, make sure your butter is actually softened. If it’s too cold, you’ll struggle mixing everything evenly, and if it’s melted, your dough will turn into a sticky disaster.
When adding powdered sugar, don’t dump it all in at once unless you enjoy chaos. Add it gradually like the recipe says, or you’ll end up with lumps and uneven texture.
If you want to switch things up, you can replace some of the Butterfinger pieces with crushed pretzels for a salty crunch, or drizzle white chocolate over the finished balls for a decorative touch. But honestly, the classic version is hard to beat.
Also, chilling the balls before dipping them in chocolate is not optional. Skip that step, and you’ll watch them fall apart in the melted chocolate like a complete mess.
Serving Ideas & When to Enjoy
These little bites are perfect for just about anything—holiday trays, parties, or even as homemade gifts. Pack them in a nice box, and suddenly you look like you put in way more effort than you actually did.
They’re also ideal for late-night cravings or as a quick dessert after dinner. Since they’re rich, one or two is usually enough… although let’s be honest, stopping at two takes some serious self-control.
Serve them chilled for a firmer texture or slightly softened for a creamier bite. Either way, they disappear fast.
Storage & Freezing Tips
Butterfinger Balls store incredibly well, which is great because you’ll probably want to make a big batch.
Keep them in an airtight container in the refrigerator for up to a week. They’ll stay firm and fresh, ready whenever you need a sweet fix.
For longer storage, freeze them. Place them in a single layer first, then transfer to a container once frozen. They can last up to 2–3 months. Just let them sit at room temperature for a few minutes before eating.
FAQ
1. Can I use crunchy peanut butter instead of creamy?
You can, but you’re already adding crunch with the candy bars. Too much texture can throw off the balance.
2. Why is my mixture too soft?
Either your butter was too warm, or you didn’t add enough powdered sugar. Fix it before shaping—don’t try to wing it.
3. Can I skip the shortening in the chocolate?
Yes, but your chocolate may be thicker and harder to work with. The shortening helps create that smooth coating.
4. Do I have to refrigerate them?
If you want them to hold their shape and not turn into a sticky mess, then yes.