Cherry Bars: Buttery, Sweet, and Bursting with Cherry Goodness
Cherry Bars: Buttery, Sweet, and Bursting with Cherry Goodness
Introduction
Some desserts don’t try to be fancy—they just work. And honestly, those are usually the ones people keep coming back for. Cherry bars fall right into that category. They’re simple, comforting, and packed with that perfect balance of buttery richness and fruity sweetness that makes you reach for “just one more” every single time.
There’s something about cherries that feels a little nostalgic. Maybe it’s the bright color, the sweet-tart flavor, or the way they remind you of homemade desserts cooling on the counter while everyone waits impatiently. These cherry bars bring all of that feeling into one easy, crowd-pleasing recipe.
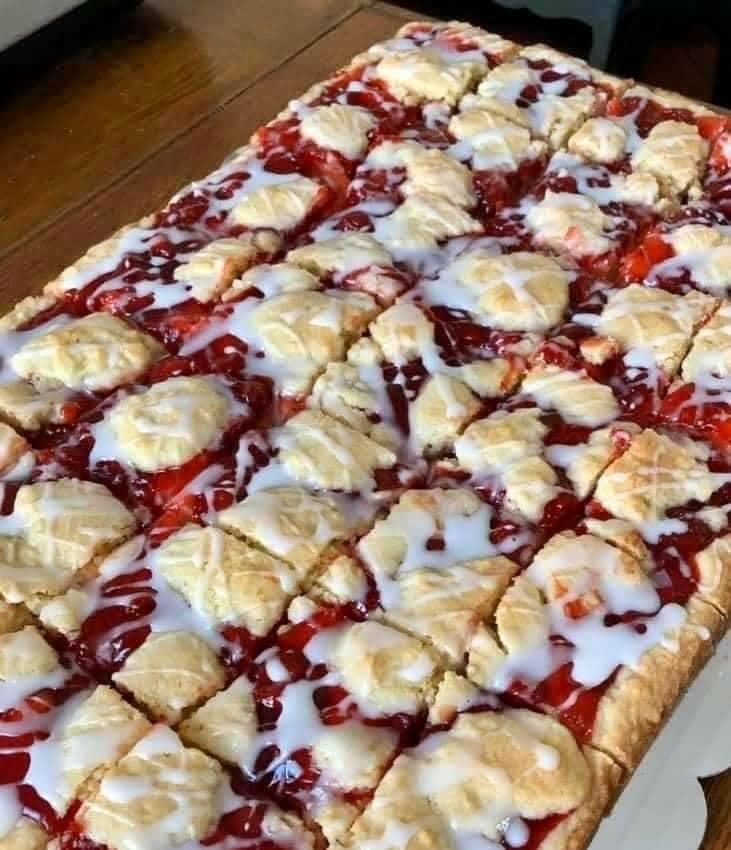
What makes this recipe stand out is the texture. You get a soft, buttery base, a generous layer of luscious cherry filling, and then little pockets of golden dough baked right on top. And just when you think it couldn’t get better, there’s a sweet glaze drizzled over everything, tying it all together in the most satisfying way.
Whether you’re baking for a family gathering, a casual weekend treat, or just because you felt like making something sweet (which is reason enough), these cherry bars deliver every single time.
CHERRY BARS
Ingredients:
1 cup butter, softened
2 cups sugar
1 teaspoon salt
4 large eggs
1 teaspoon vanilla extract
1/4 teaspoon almond extract
3 cups all-purpose flour
2 cans (21 ounces each) cherry pie filling
GLAZE:
1 cup confectioners’ sugar
1/2 teaspoon vanilla extract
1/2 teaspoon almond extract
2 to 3 tablespoons whole milk
Directions:
LETS MAKE IT-
Preheat oven to 350°. In a large bowl, cream butter, sugar and salt until light and fluffy. Add eggs, one at a time, beating well after each addition. Beat in extracts. Gradually add flour.
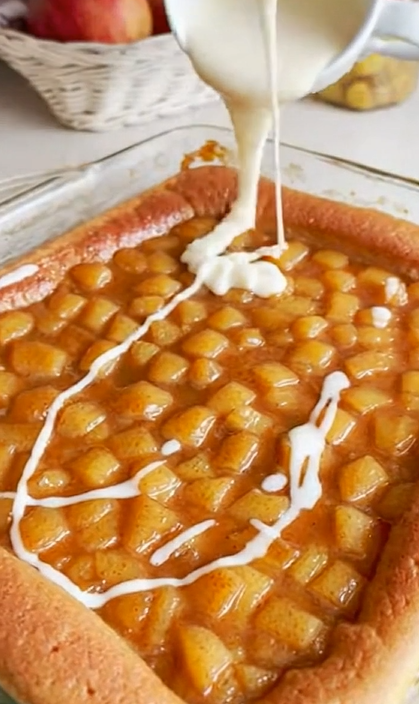
Spread 3 cups dough into a greased 15x10x1-in. baking pan. Spread with pie filling. Drop remaining dough by teaspoonfuls over filling. Bake 35-40 minutes or until golden brown.
Cool completely in pan on a wire rack.
In a small bowl, mix confectioners’ sugar, extracts and enough milk to reach desired consistency; drizzle over top.
Cooking Tips & Substitutions
If you want these cherry bars to come out perfect, pay attention to the butter—it should be softened, not melted. That’s what gives the base its light, fluffy texture instead of something dense or greasy.
When spreading the dough into the pan, don’t worry about making it perfectly even. A slightly rustic base actually works in your favor, especially once the cherry filling and topping go on. Speaking of filling, you can swap cherry pie filling for other flavors like blueberry or raspberry if you want to change things up without touching the structure of the recipe.
If almond extract isn’t your thing, you can reduce the amount slightly, but don’t skip it completely—it adds a subtle depth that pairs beautifully with the cherries.
Serving Ideas
These bars are incredibly versatile. Serve them chilled for a firmer texture or at room temperature if you prefer them soft and tender. They’re perfect with a cup of tea or coffee, especially in the afternoon when you want something sweet but not overly heavy.
For a more indulgent dessert, try serving them slightly warm with a scoop of vanilla ice cream. The contrast between the warm bars and cold ice cream is honestly hard to beat.
They’re also ideal for gatherings—easy to slice, easy to serve, and guaranteed to disappear quickly.
Storage & Freezing Tips
Store your cherry bars in an airtight container at room temperature for up to 2 days. If you want them to last longer, refrigerate them—they’ll stay fresh for up to 5 days.
To freeze, cut them into squares and wrap individually. Store in a freezer-safe container for up to 2 months. When you’re ready to eat, let them thaw at room temperature or warm them slightly for that just-baked feel.
FAQ
1. Can I use fresh cherries instead of pie filling?
Yes, but you’ll need to cook them down with sugar and a thickener first to mimic the consistency of pie filling.
2. Why is my base too soft?
It may need a bit more baking time. Make sure the top is golden brown before removing from the oven.
3. Can I make these ahead of time?
Absolutely. In fact, they taste even better the next day once everything has settled and the flavors have blended.
4. How do I get a perfect glaze consistency?
Add milk slowly, one tablespoon at a time, until it’s thin enough to drizzle but not runny.