Copycat Samoa Girl Scout Cookies: Homemade Caramel, Coconut & Chocolate Treats
Copycat Samoa Girl Scout Cookies: Homemade Caramel, Coconut & Chocolate Treats
Introduction
If you grew up enjoying Girl Scout cookies, you know the magic of the Samoa—crispy cookie, gooey caramel, toasted coconut, and a generous chocolate drizzle. For years, I avoided making these at home because they seemed complicated, almost like they belonged behind the glass at a bakery or in a thin cardboard box labeled “limited edition.” But I finally decided to take the plunge, and I’ll admit: the effort was completely worth it.
Making these cookies at home isn’t just about the end product; it’s about the process. Toasting coconut fills the kitchen with a sweet, nutty aroma that instantly makes you feel cozy. Melting caramel in the microwave and stirring until creamy is oddly therapeutic, and piping chocolate onto the finished cookies feels like icing on the memory of every Girl Scout cookie you’ve ever eaten. There’s a special joy in creating something that tastes like a childhood treat, but with your own two hands and a little extra pride.
These cookies are perfect for weekends, holidays, or just a sweet afternoon indulgence with coffee or milk. They also make wonderful gifts when wrapped in parchment and ribbon. While the recipe looks long, it’s mostly straightforward steps that can be broken up over a couple of days to make the process stress-free. Once you see that golden cookie base, smothered in caramel, topped with coconut, and finished with chocolate, you’ll realize why this recipe is worth every minute in the kitchen.
Recipe
The Cookie Base
Ingredients
-
2 sticks/1 cup softened butter (can be either salted or unsalted)
-
1/2 cup granulated sugar
-
2 cups all-purpose flour
-
1/4 teaspoon baking powder
-
1/2 teaspoon salt
-
2 tablespoons milk
-
1 teaspoon vanilla
Instructions
-
Cream together the butter and sugar until light and fluffy
-
In a small bowl whisk together the flour, baking powder and salt.
-
Gradually add the flour mixture to the creamed butter and sugar mixture, scrape down bowl as needed.
-
Add the vanilla, then add the milk 1 Tablespoon at a time. (I only needed to add 1 Tablespoon but didn’t figure that out until after I added 2 so I needed to add more flour 1 Tablespoon at a time until the dough was the right consistency)
-
Separate dough into 2 disks, wrap in plastic wrap and chill for 1 hour. Or what I did was I made the dough into a log and wrapped the dough in plastic wrap then cut the ends off of a 17 oz water bottle, cut a slice all the way across the top of the bottle and then placed the cookie log inside the bottle still wrapped in plastic, and you can adjust the opening to the size you want the cookie size to be. (Mine was about two inches) Using the tube the cookies pretty much stayed in a circle without a flat bottom. Then I chilled the dough for about 1 hour. Remove the dough.
-
Then I sliced the cookies into 1/8th or 1/4in slices, and I used a 1 inch cookie cutter to cut out the center of each cookie (if you don’t have a 1 inch cookie cutter you could use the cap from the water bottle, make sure you flour the cap in between each cookie so the dough doesn’t stick). Place on a prepared pan (I use a silpat) and bake in a 350 degree oven for 10-15 min or until they are a light golden brown around the edges. (Mine were done in 10) Cool on pan for a few minutes then cool completely on a wire rack.
Coconut Topping
Ingredients
-
3 cups of toasted sweetened shredded coconut
-
20 oz. caramel (Kraft or Brachs, or homemade)
-
4 tablespoons milk
-
1 teaspoon vanilla
Chocolate for Drizzle and Dipping
-
12 oz dark or semi-sweet chocolate (Ghirardelli works well)
-
Coconut oil or shortening for melting
Instructions for the Caramel and Coconut Topping
-
Melt the caramels on 50% power in a microwave-safe bowl with the milk and vanilla in 1-minute intervals, stirring in between until the caramel comes out creamy.
-
Combine 1/2 the caramel with the coconut and stir until combined.
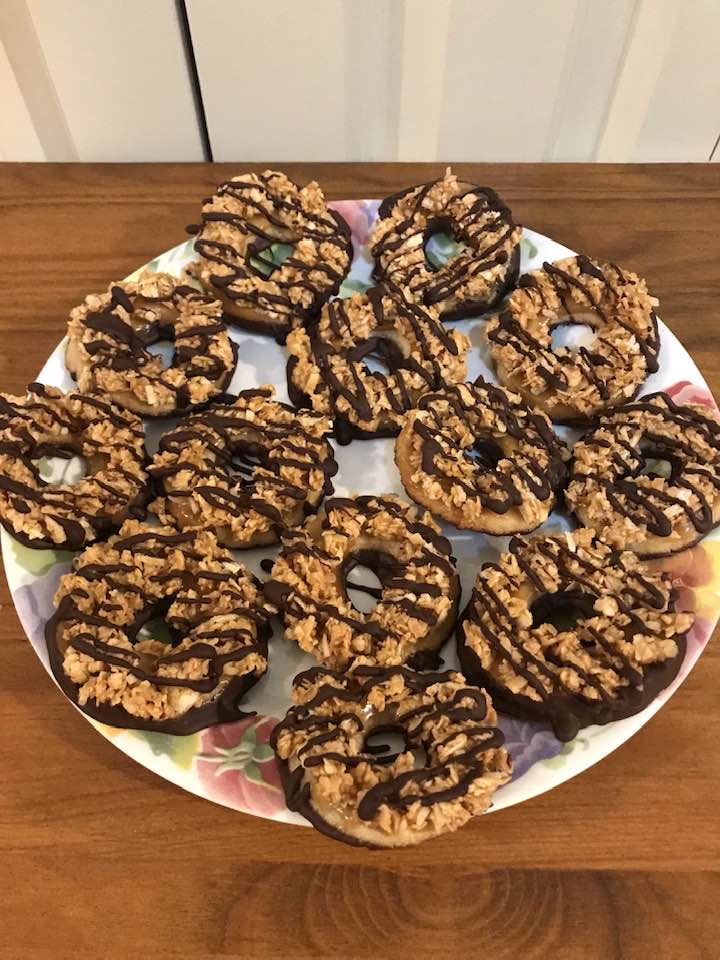
Assembling the Cookies
-
Spread a thin layer of caramel on top of each cookie ring. (Don’t skip this step as the caramel works as a glue to help the coconut mixture stick.)
-
Press the coconut mixture onto each cookie.
-
When all the cookies are topped with the caramel coconut mixture, dip each cookie bottom into the chocolate and then place on a parchment-covered baking sheet (so the cookies don’t stick) and drizzle each cookie with chocolate. (I used a ziplock sandwich bag with a tiny corner cut off.)
-
Let the cookies sit until the chocolate hardens and then enjoy! The cookies can be stored in an airtight container with parchment paper separating each layer.
Tips and Tricks
-
Two-day approach: Make the cookie base one day and the caramel/coconut topping the next to save stress.
-
Cookie cutter hacks: Use small bottle caps if you don’t have a round cookie cutter; flour them each time to prevent sticking.
-
Chocolate melt tip: Adding a little coconut oil keeps the chocolate smooth and glossy.
-
Toasting coconut: Watch it carefully—coconut can burn quickly but burns evenly give it a deep flavor.
Serving Ideas
These cookies are perfect for holiday platters, birthday treats, or a sweet snack with coffee. Serve them chilled or at room temperature. Pairing with a cup of hot chocolate or milk makes them irresistible.
Storage
Store cookies in an airtight container, layering parchment paper in between to prevent sticking. They last up to a week at room temperature or can be frozen for longer storage. Just thaw before serving and enjoy the caramel and chocolate in all its glory.
Frequently Asked Questions
Can I make the cookies smaller or larger?
Yes, just adjust the dough slice thickness and the size of the center cutout accordingly.
Can I use salted butter?
Absolutely. It adds a nice contrast to the sweet caramel and chocolate.
Do I have to use store-bought caramel?
No, homemade caramel works wonderfully and reduces the fussy unwrapping step.
How do I get the chocolate drizzle to look neat?
Use a ziplock bag with a small corner cut or a piping bag for more control.