Hidden Mint Cookies: A Homemade Take on Classic Thin Mint Magic
Hidden Mint Cookies: A Homemade Take on Classic Thin Mint Magic 🍫🌿
Introduction
Some cookies don’t just satisfy a sweet tooth—they bring back memories. If you’ve ever waited all year for those iconic mint-chocolate treats, then these Hidden Mint Cookies are about to become something special in your kitchen. They capture that familiar combination of cool peppermint and rich chocolate, but with a homemade twist that makes them even more satisfying.
There’s something incredibly comforting about recreating a favorite treat from scratch. The process itself feels a little nostalgic—mixing, shaping, and baking, then finishing each cookie with layers of sweetness and a hint of mint. It’s not just about the final result, but the experience of making something that feels both familiar and personal.
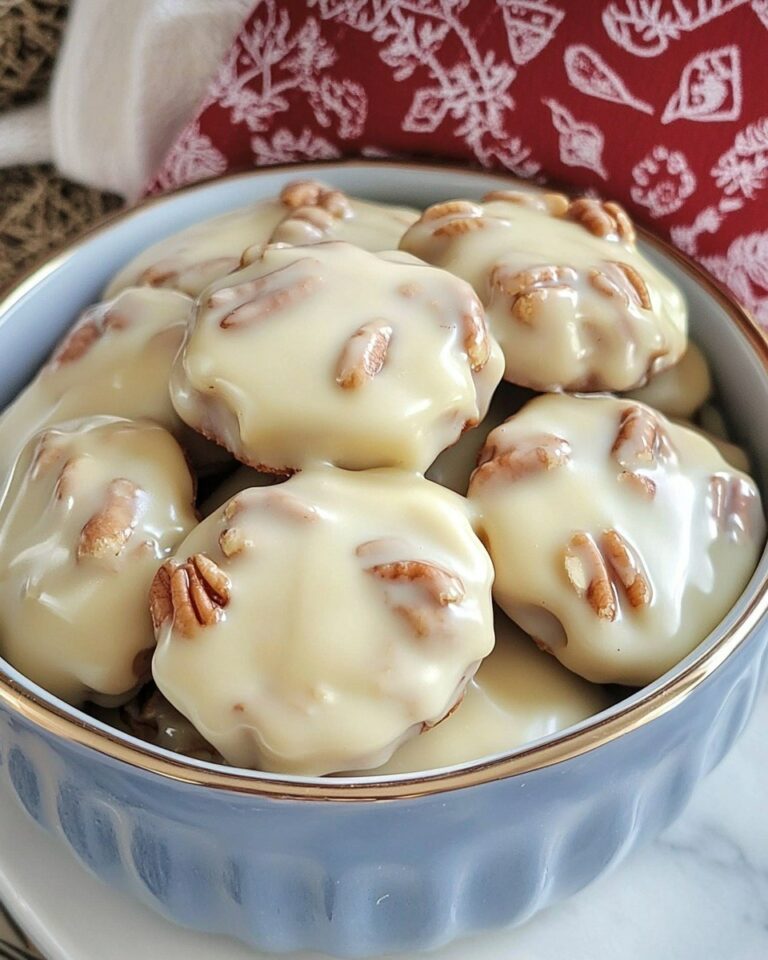
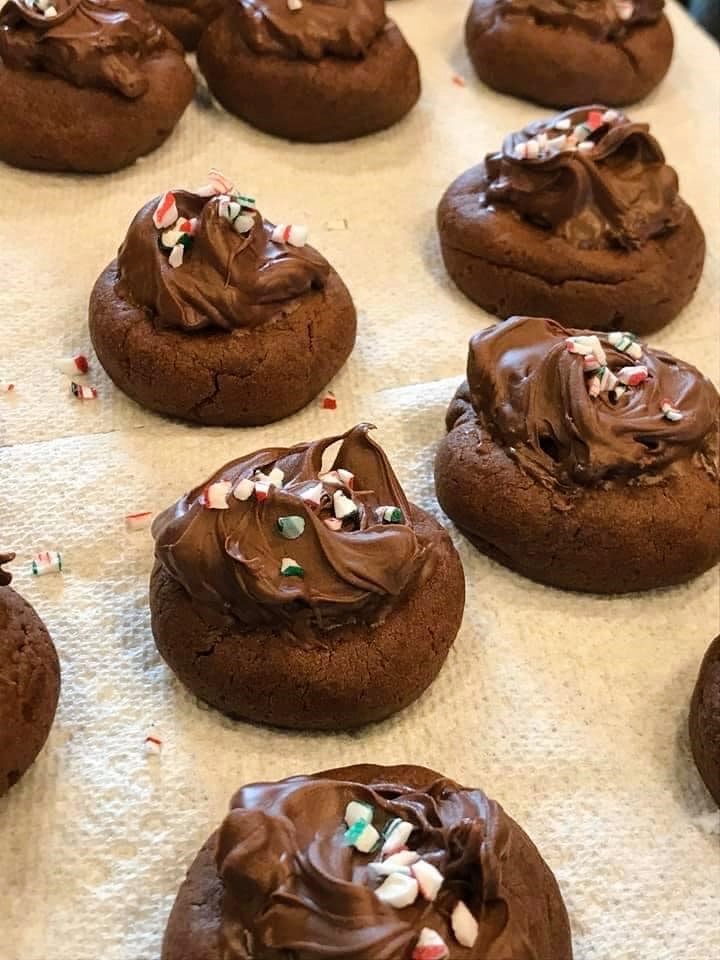
What makes these cookies stand out is the “hidden” surprise. That soft, minty center tucked beneath a layer of chocolate creates a delicious contrast in both flavor and texture. Every bite starts with smooth chocolate, then gives way to that refreshing peppermint sweetness, followed by a tender cocoa cookie base.
They’re perfect for holidays, gift boxes, or just a cozy baking day when you want something a little extra special. And honestly, once you make these, you might stop waiting for store-bought versions altogether. These are richer, fresher, and made exactly the way you like them.
Hidden Mint Cookies
Ingredients
Cookies
1 3/4 cups flour
1/3 cup unsweetened cocoa
1 1/2 tsp baking powder
1/4 tsp salt
1/8 tsp ground cinnamon
1/3 cup crisco
1/3 cup butter
3/4 cup sugar
1 lg egg
1 Tbs milk
1 tsp vanilla extract
Topping
2 cups powdered sugar
3 Tbs light corn syrup
3 Tbs melted butter
1/2 Tbs peppermint extract
23 oz bag milk chocolate-chips
Directions
Mix ingredients for the cookie base. Refrigerate dough about 3 hours. Heat oven to 375. Roll dough into balls. Flatten top of cookie with a glass. Take wooden spoon and make a hole (depression) in the center of the cookie. Bake for 9 min and remove from oven. Next mix up the topping mixture and place spoonful into the depression of the cookie. I overlap the depression. Next melt the 23 oz of chips and spoon a small amount over tops of the mint topping. Cover with sprinkles or crushed candy canes while chocolate is still wet. Makes about 20 cookies
Cooking Tips and Substitutions
These cookies have a few steps, but don’t mess them up by rushing. The dough needs that chilling time—skip it, and you’ll end up with flat, messy cookies instead of nicely shaped ones. Three hours might feel long, but it’s worth it.
When flattening the cookies, don’t press too hard. You just want a gentle shape, not a pancake. And when making the center depression, be careful not to push all the way through—this isn’t a donut.
If you want a stronger mint flavor, you can slightly increase the peppermint extract—but don’t go overboard unless you enjoy that toothpaste-level intensity. For a different twist, try dark chocolate instead of milk chocolate for the topping. It gives a deeper, less sweet finish that balances the filling better.
No Crisco? Fine, use all butter—but expect a slightly softer texture. Still good, just different.
Serving Ideas and When to Enjoy
These cookies are basically made for holidays. Between the chocolate coating and minty center, they look right at home on a festive dessert tray. Add some crushed candy canes on top, and suddenly they look like you actually put in serious effort.
They’re also great for gifting. Stack them in a box, wrap them up nicely, and people will think you spent way more time on them than you actually did.
Or just keep them for yourself. Honestly, that’s probably the smarter move.
Serve them with coffee, hot chocolate, or even a glass of cold milk. The mint-chocolate combo works with everything.
Storage and Freezing Tips
Once they’re fully set, store these cookies in an airtight container at room temperature for a couple of days, or in the fridge if your kitchen is warm.
If you stack them, use parchment paper between layers unless you want a sticky disaster. The chocolate topping can smudge if you’re careless.
You can also freeze them. Just make sure they’re completely set first, then store in a freezer-safe container. When ready to eat, let them thaw at room temperature—no need to reheat.
Frequently Asked Questions
1. Can I skip the mint filling?
You can, but then they’re not really “Hidden Mint Cookies” anymore, are they?
2. Why did my cookies spread too much?
Because you probably didn’t chill the dough long enough. Follow the steps next time.
3. Can I use dark chocolate chips?
Yes, and it actually improves the flavor if you don’t want them overly sweet.
4. How do I keep the chocolate coating smooth?
Melt it slowly and don’t overheat it. Burnt chocolate ruins everything.