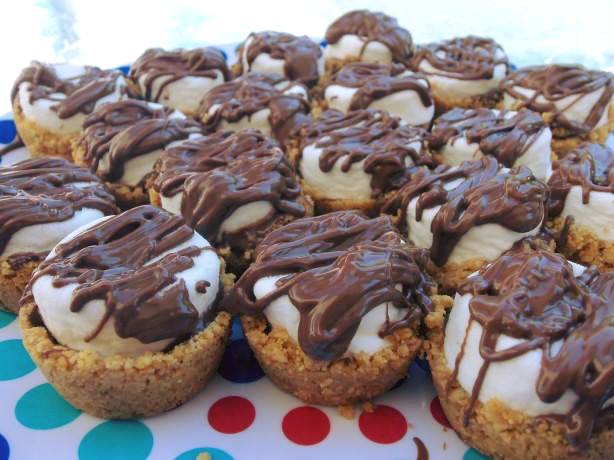
S’mores Cups: A Bite-Sized Twist on a Campfire Classic
S’mores Cups: A Bite-Sized Twist on a Campfire Classic
There’s something undeniably magical about s’mores. Maybe it’s the way the chocolate melts just enough to blend into the gooey marshmallow, or how the graham crackers hold everything together in that perfect, slightly messy bite. It’s a treat that instantly brings back memories—crackling fires, laughter under the night sky, and that unmistakable toasted marshmallow smell drifting through the air.
But let’s be honest—not everyone has the time (or patience) to build a campfire every time a craving hits. That’s exactly where these s’mores cups come in. They take everything you love about traditional s’mores and transform it into a neat, bite-sized dessert that you can make right in your kitchen. No fire, no sticks, no mess—just pure, nostalgic goodness.
What makes these especially fun is how surprisingly easy they are. At first glance, they look like something you’d find in a bakery display—perfectly shaped, layered, and finished with a glossy chocolate top. But once you make them yourself, you’ll realize they’re actually one of those “why didn’t I try this sooner?” recipes.
They’re perfect for parties, family gatherings, or even just a quiet evening when you want something sweet but a little more special than the usual snack. And because they’re individually portioned, they’re easy to serve, share, and—let’s be real—grab more than one without anyone noticing.
SMORES CUPS:
Ingredients:
• 7 whole graham crackers, finely crushed
• 1/4 cup powdered sugar
• 6 tbsp butter, melted
• 4 bars milk chocolate candy
• 12 large marshmallows
Directions:
You are going to be shocked how easy these are.
Step 1:
Preheat oven to 350°F (180°C). Place graham crackers into a large resealable plastic bag. Finely crush into crumbs using Baker’s Roller®;. Combine graham cracker crumbs, powdered sugar and butter in Small Batter Bowl
Step 2:
Using Small Scoop, place scant scoop of crumb mixture in each cup of a Mini-Muffin Pan. Press crumbs to form shallow cups with Mini-Tart Shaper. Bake 4-5 minutes or until edges are bubbling
Step 3:
While the crust is in the oven, break two of the candy bars into rectangles. Remove pan from oven; place one rectangle into each cup.
Step 4:
Cut marshmallows in half crosswise using shears dipped in cold water. Place one marshmallow half, cut-side down, into each cup. Return to oven 1-2 minutes or until marshmallows are just slightly softened. Remove from oven to a cooling rack; cool 15 minutes. Carefully remove cups from pan. Cool completely.
Step 5:
Break remaining candy bars and place in (1-cup/250 mL) Prep Bowl. Microwave on HIGH 1 minute-1 1/2 minutes or until melted and smooth, stirring every 20 seconds. Dip the top of each marshmallow in melted chocolate. Turn top-side up and let stand 40 minutes-1 hour or until set.
Yield: 24 cups
Store the cups in a single layer in an airtight container for up to 1 week. Freezing is not recommended. For a richer chocolate flavor, substitute dark chocolate candy bars for the milk chocolate.
Tips to Make Them Even Better
Even though this recipe is straightforward, a few small tweaks can take your s’mores cups to the next level.
When crushing the graham crackers, aim for fine, even crumbs. This helps the crust hold together better and gives each cup a smoother texture. If the crumbs are too chunky, the base may crumble when you remove them from the pan.
Pressing the crust firmly into the muffin pan is also key. A well-shaped base ensures the cups hold their form after baking and don’t fall apart.
When melting the chocolate, go slowly. Stirring every 20 seconds prevents burning and keeps the texture silky smooth—perfect for dipping.
Serving Ideas and Occasions
These little treats are incredibly versatile. They’re perfect for birthday parties, holiday gatherings, or even casual movie nights at home. Because they’re small and neatly portioned, they make serving effortless.
You can also dress them up a bit by drizzling extra chocolate on top or sprinkling crushed graham crackers for added texture. If you’re serving guests, arrange them on a platter for an eye-catching dessert display.
They pair beautifully with a glass of milk, a cup of coffee, or even hot chocolate if you really want to lean into the cozy vibes.
Storage Tips
These s’mores cups store surprisingly well. Keep them in an airtight container at room temperature for up to a week, and they’ll maintain their texture and flavor.
It’s best to store them in a single layer to prevent sticking or smudging the chocolate topping. While freezing isn’t recommended, they rarely last long enough for that to even be an issue.
Frequently Asked Questions
Can I use dark chocolate instead of milk chocolate?
Yes, and it’s actually a great option if you prefer a richer, less sweet flavor.
What if I don’t have a mini muffin pan?
You can use a regular muffin pan, but the cups will be larger and you’ll need to adjust the baking time slightly.
Why are my cups sticking to the pan?
Make sure to let them cool properly before removing. You can also lightly grease the pan to help prevent sticking.
Can I make these ahead of time?
Absolutely. They’re perfect for preparing a day or two in advance since they store so well.